Stucco news home
Plantons made by Dan
August, 2002
These plantons (decorative bands,
window surrounds, etc.) are made by
Dan, a plasterer in Oceano, California. E-mail Dan
at [email protected]
They seem to be a great time saver, and could have saved
me a lot of money on
my current project, an addition on an old house that
has a lot of bands and details.
I don't know how practical the shipping would be from
3000 miles away, but I think
I'll try an experiment, and let you know.
 |
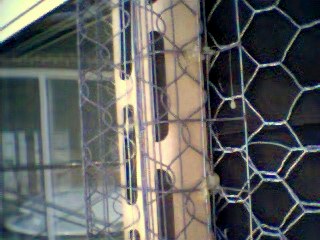 |
These window surrounds and bands take a long
time, when formed with wood and cement mortar.
These honest to goodness cement bands beat the hell out of gluing
flimsy foam to the wall. |
These patented pre made plantons, are simply
metal lath bent with a corner aid (western corner bead) attached,
pre bent to the finish dimension of the band. |
 |
 |
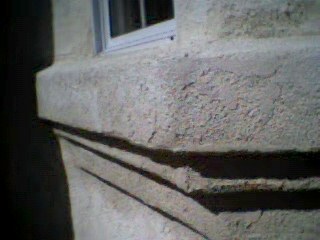
| Dan makes his plantons in different stock designs, including this
three step band. Pricing is very reasonable. ( I don't know about shipping,
however) |
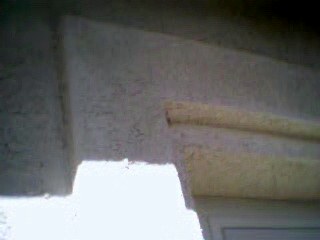
Window surrounds are made as a kit, and priced
according to the design.
Dan says, "I have also made pot shelves that protrude away from
the wall 12 inches and two fat guys can sit on it without any cracks" |
 |
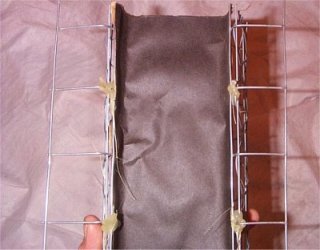 |
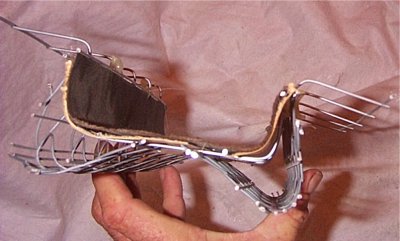
Top view showing:
1. Pre bent lath
2. Corner aids pre-set
3. Building paper lining to meet building codes |
A view of the back side of the sample Dan sent
me, showing the lining. |
Hello, my name is Dan and I have been a plasterer for 32 years here
in California. I wanted to comment on your
web page, and I am glad to see someone put eifs in its place.
We do not do much eifs here on the central coast of ca.
But we do stick foam bands on over our brown coats and most contractors
here have a negative opinion on foam for
obvious reasons. I wanted to get your mailing address so I can
send you a sample of a new way to do stucco plantons I
will be getting my second patent on them in a month or so, I wanted
to see if I can get an opinion from you? Its not
rocket science but they work good with no cracks so far any ways.
Have been installing them and plastering over them
since 94 on custom homes and a few tracts of homes in my small town
area with excellent results. I sorta make them
out of the garage if you will, so I can n! ot do big orders right now,
but was thinking if I ever advertised online it would
be with a web page like yours because I agree with it 100% what drew
me to the page that stuck with me is the article
regarding tearing off the foam with your bare hands, and of course
who could put this crap on the wall! like to see
people be upfront with opinions. My products are also green.
They are designed to receive the normal 7/8 inch plaster
3 coat.
These plantons come in 8 foot sticks and are designed to be installed
after the house or building have been
waterproofed. Been making these with a bullnose can can also use a
sharp corner aid if needed. Already in
process of doing more R & . Eventually the aid will be spot welded
instead of non toxic hot glue. As well,
the corner aid will eventually be integrally designed where it will
be all one piece. Reggie, what's not here to
achieve the shape is the lumber, of course, and there is NO FOAM.
To damage these after the brown coat you would need a big hammer. There
is no question on the strength,
I have also made pot shelves that protrude away from the wall 12 inches
and two fat guys can sit on it without
any cracks. I got pics of that. I think that is damn good for being
hollow inside. They do retain a 7/8 inch
fill which is more than enough for non-structural plantons. They are
expensive because they are all made by
hand with few machines right now, until I can get the funding for wire
forming machines so I can lower the price.
Here, Reggie, on custom homes they spend more money on the bands than
it costs to plaster the whole house.
Right now I can only put out about 800 to 1000 feet per day, but do
have some inventory. I'm not sure if I'm
ready for advertising yet, but you never know. These plantons are also
good I think for fixer uppers where one has
to try to hide wires and pipes, and can dress up an older house. You
can't really use these, though, if you are just
doing a restucco, unless you wanted to go to the trouble of doing some
demo first. The nailing flange is the key,
of course it keys into the existing lath for the plaster key, after
these bands are scratched you can't budge them.
One does not have to use the nailing flange just to nail it down, you
can put 10 penny galvanized through the
center channel, also, you just need to tack these up, the mud is what
makes them strong, of course.
It helps to have a radial arm chop saw that can do the picture frame
cuts for a clean flush abutment. The only
thing to watch out for is when you have a stud sucked in you would
need to shim that particular stud.
After training lathers myself it seems they take a few houses before
they get it down. I call for these plantons to be
nailed at every stud at 16" centers. California code requires two layers
of 60 minute paper plus a layer of
bituthene over any plantons, because mostly from the lumber warping
and cracking the plaster.
There is a lot more to say but will let it go for now I just want to
get this sample in the mail.
Thanks, Dan
Stucco news home