Recoating Chimney caps
Reggie,
Yes, I accidentally stumbled onto your site today.
I have attached (3) photos of my house which is located in Asheboro, North Carolina, which is in the center of the state.
My house was designed and built in 1934 by the original owner. I'm the second.
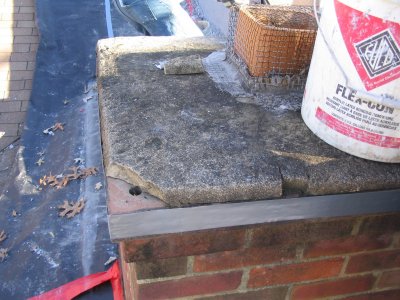
As you can tell from the photos, the stucco is cracking and sliding off the top of my chimney.
The outer coating thicknesses range from 1/4" to 1/2".
The metal cap has rusted through, which has allowed water to come in and probably penetrate the coating.
Repeated freezing and thawing cycles over 60+ years has probably separated the coating.
Pieces have been falling off for about two years and it's getting worse. I think the only way to fix this is to completely remove the coating and start over.
My guess is to hammer off the remaining coating, secure metal lath to the structure and re-stucco, replace the metal cap.
The problem is trying to find someone local to fix it. It's pretty high up.
The answer I've been getting is to cover the whole top with something else.
The chimney is so much a part of the house and the overall look of the house. I don't want to change anything, except the metal cap. We've been in the house for 9 years and never used the fireplace. However, we really want to.
The original owners placed a steel plate over the opening. They didn't use it either.
Do you have any suggestions or know anyone in my area that could help ?
It's hard to find "stucco repair" listed in the phonebook.
I don't know anybody in your area. All I can do is tell you how to do it, assuming you can find someone competent. Also, you need someone competent in scaffolding. Chimneys use a lot of scaffold, and it needs to be safe. I'm not going to climb a scaffold that is shaky and flaky.
The stucco can be recoated using an acrylic additive in the mortar. First the loose areas need to be chipped to expose the bare mortar, including areas where the cap was re-coated and the new mortar failed.
One should use a bonding coat first, then a finish coat. You can find someone with basic masonry skills to do this for you. It is critical an acrylic bonding admixture is used in the mortar (and not painted on first) or the recoat will fail. A bonding coat defined is applying mortar that is mixed with an acrylic admixture. We use a mix of half acrylic and half water instead of just water in the mortar. We also use a half and half mix in our finish coat. The acrylic has a side benefit of making the mortar less porous, and another benefit is the mortar is twice as strong.

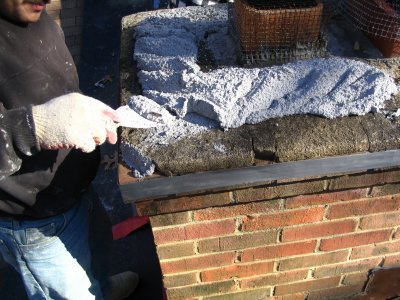
Loose areas are chipped off and surface dirt and dust cleaned off. Duct tape is put around the bottom of the cap to keep mortar off brick. The roof is covered real good with tarpaper and tape This mortar will not come off the roof. Note the flex con bucket This is mixed half and half with water, then mixed into the mortar. We didn't use a bonding coat here. Mortar is white portland and sand colored to match the addition. It is a good idea to put on a bonding coat first, then a finish, but here we did a one coat wonder. If you do a one coat wonder, it is a good idea to check for shrinkage cracks the next day, and put on a thin coat on the whole cap if necessary.

Mortar is poured on top of cap. Here, Mynor scoops off some mortar with a putty knife to fill in holes and chipped areas.

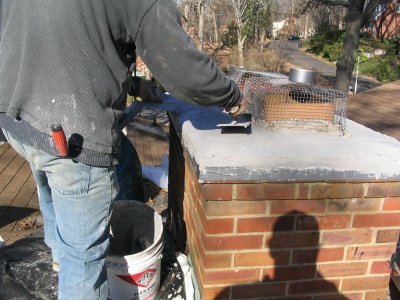
Mortar is spread out and troweled after it starts to set. The middle needs to be higher than the outside for water to run off.