Stucco and the blind man
Chapter 12: Chimneys.
The three main reasons chimneys fail or leak:
1. The crown, or cap on the top. These may be metal and have rusted or were poorly done from the beginning and are causing excess water to run into the house. These may be mortar, which deteriorate and fall apart. These also are poorly done , for example, mortar with too much sand or whatever causing the crown to deteriorate prematurely. Since the mortar on top is horizontal, these crowns soak in water and eventually fail. It is a good idea to check the top of the chimney every few years to make sure they are still in good shape. Of course, very few people will climb up a shaky, tall ladder to inspect a chimney.
Number 2. Flashing. Flashing that is poorly done or has deteriorated is a big reason for stucco failure or leaks. Flashing is the sheet metal where the chimney meets the roof.
The number 3 reason for chimney failure is chimney shoulders. Some chimneys don't have shoulders. Shoulders are the areas where chimneys go from wide at the bottom to narrower at the top. They arent completely horizontal, but allow water to soak in.
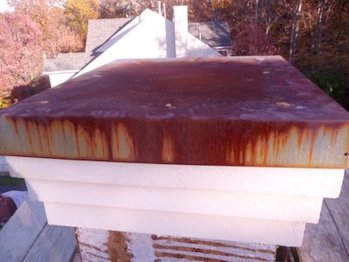
Galvanized steel chimney cap are lower in the center than the sides allowing water to pool and rust. This chimney is 15 years old. It wouldn't be hard to put these on higher in the center than the sides. All someone would need to do is put some 2 x 4 blocks in the center to hold the shape. Galvanized steel should last a long time if water didn't pool.
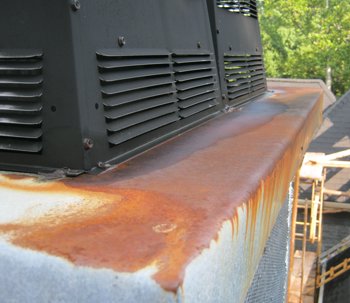
Water pool on this 9 year old chimney had already rusted through, rotting the framing. Every time it rained, the homeowners would hear a dink dink dink.
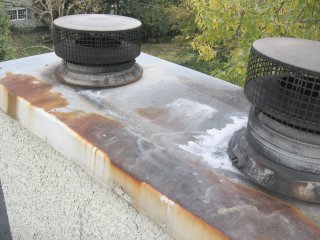
The water pool ran into the chimney and had deteriorated the bricks.
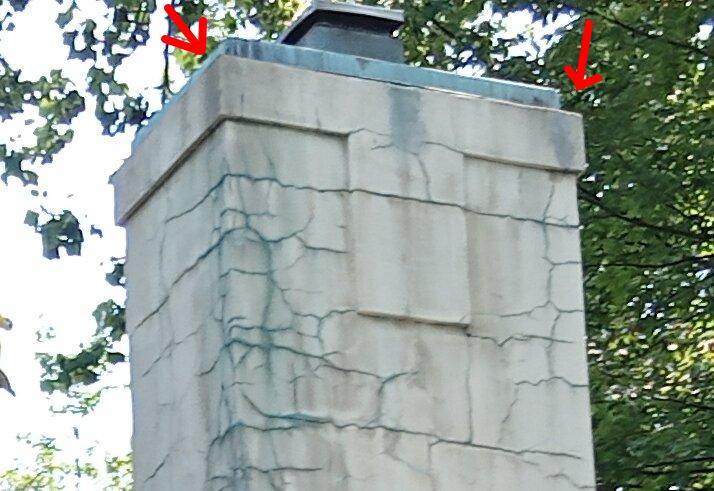
This copper cap didn't help. Water runs off the copper cap right into the chimney. Note the blue coming out of the cracks in the stucco.
Here are details on a chimney we recently finished in Charlottesville, Virginia. The chimney was leaking like crazy..
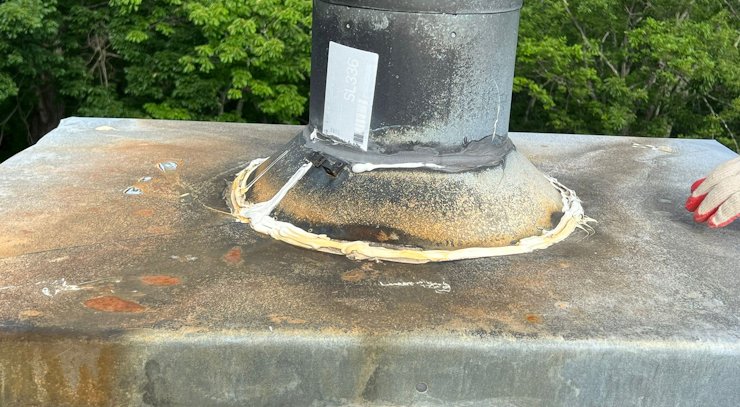
Here, the water pool ran right under the spark arrestor. The tops of these metal chimneys get hot, and the caulking hardens and shrinks and cracks. When it rained, the homeowners heard a dink dink dink. This chimney leaked real bad from the cap and the flashing.
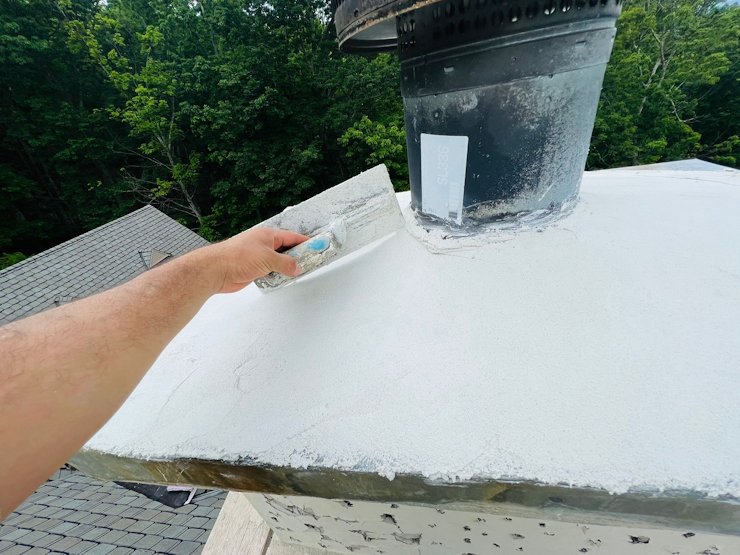
Before we put on the rubber membrane, we put on mortar and sculptured the mortar where it was higher in the center. That is, convex and not concave. This will hold the shape of the membrane. We started using membranes for chimneys not long ago. I realized that water that penetrates the mortar cap can pool on the rubber below. This mortar doesn't need lath. The weight will hold it in place.
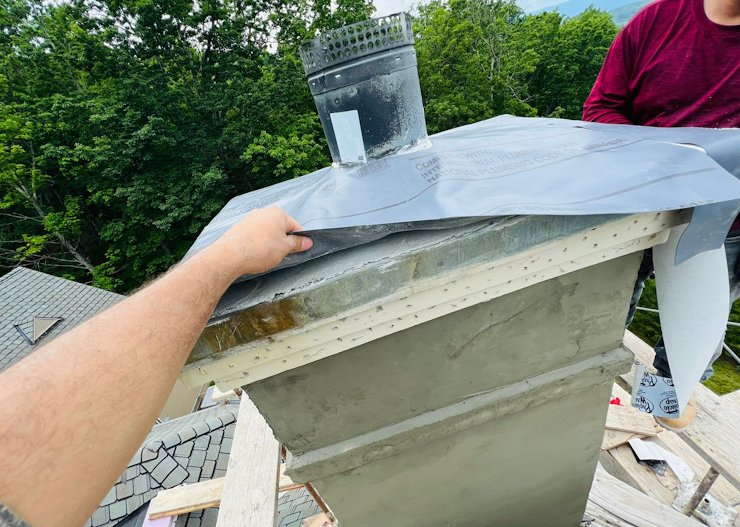
The membrane is put on and stretched over the band on the side. If water is trapped on the membrane it should exit below the band. I was surprised to find out the bands were cement mortar and not EIFS.
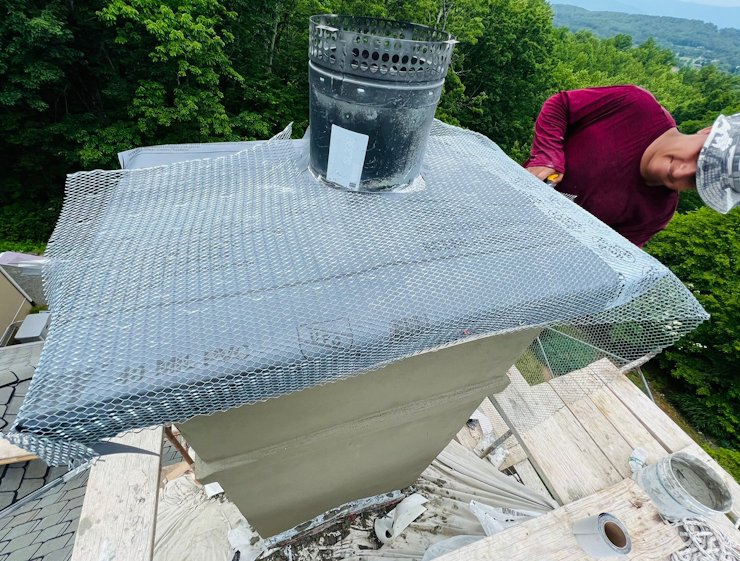
Metal lath is put on top and wrapped over the side. Note the lath isn't nailed on top. This is done like a shower. The membrane isn't punctured. The mortar we put on is heavy and won't blow off.
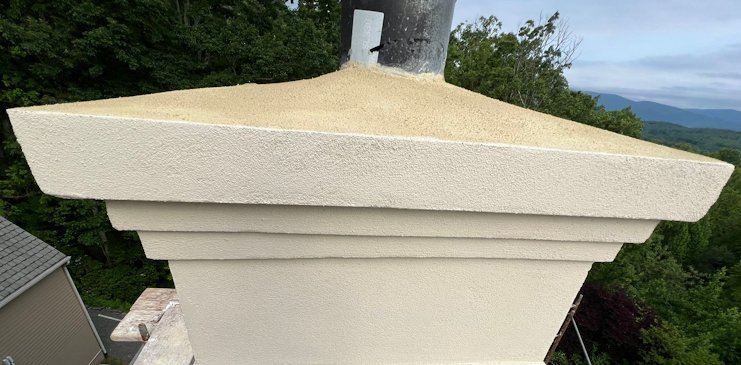
Fast forward to the finished chimney. The top is well rounded on top and won't leak.
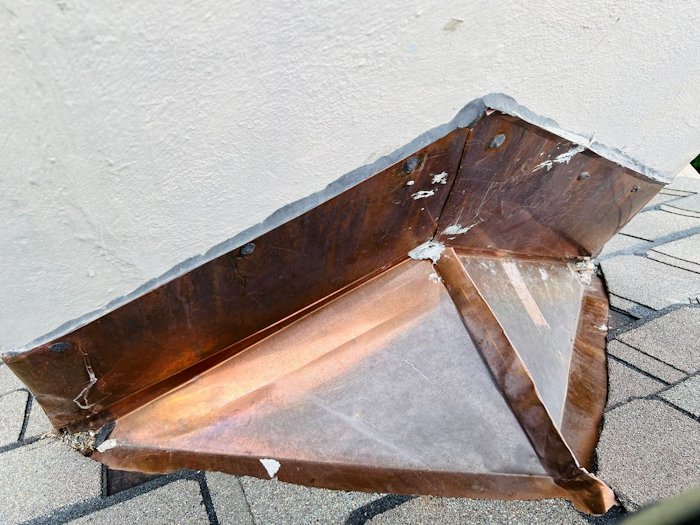
The flashing on the cricket was very well done. Too bad the damn thing leaks. The only reason the flashing leaks is the flashing goes over the stucco and not under the stucco. Not to be too redundant, but I hope you read what I said in my last chapter about flashing. A cricket is the raised area behind the chimney that deflects water to the sides of the chimney. These are a must on a steep roof.
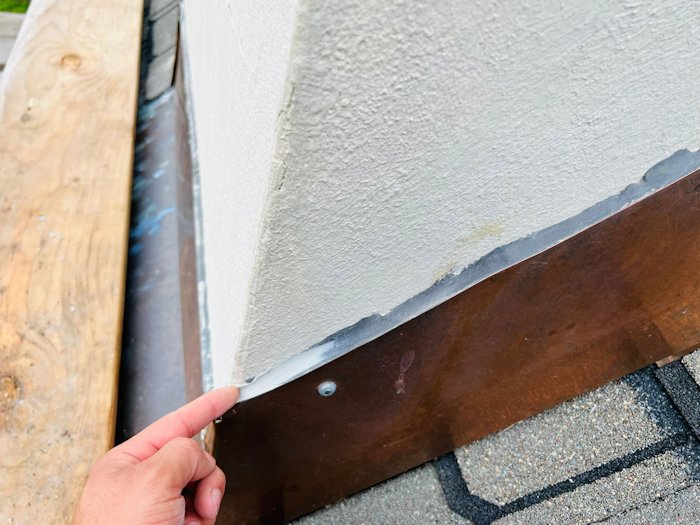
A close up showing the flashing over the stucco and not under the stucco. Water will penetrate stucco even if painted and run into the house.
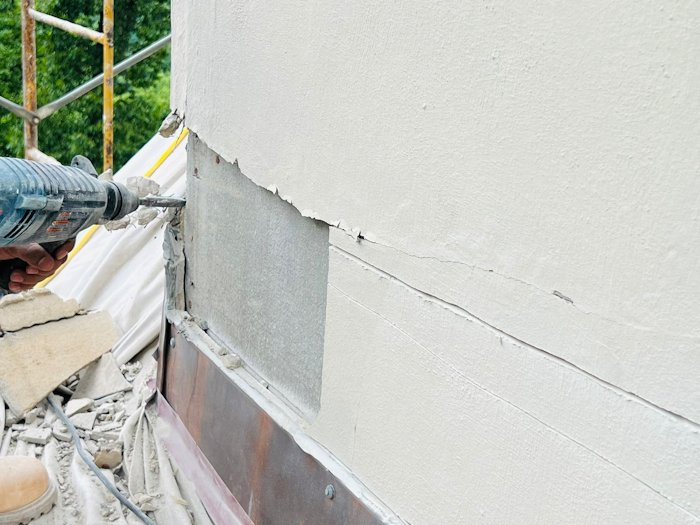
Here, the stucco is cut off above the flashing allowing for a S flashing to cover the top of the flashing like a roof. You may have seen this on my site a lot. There is no metal lath. This chimney is durock with mortar made for showers.
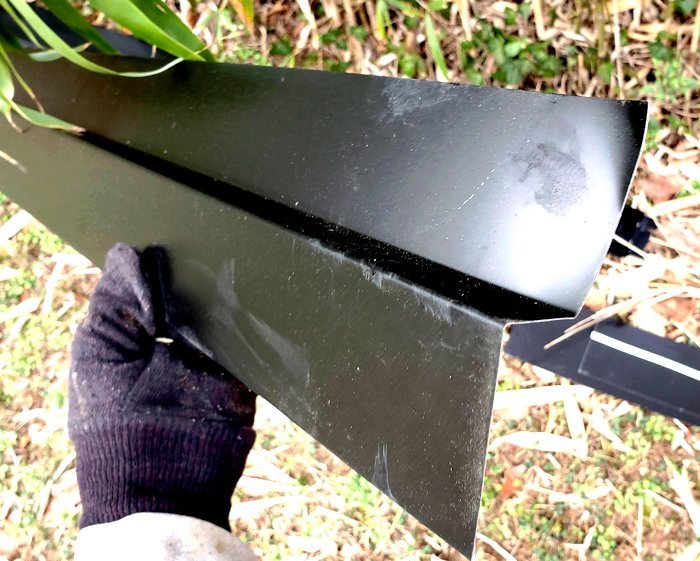
An S shaped flashing is put over the copper flashing.
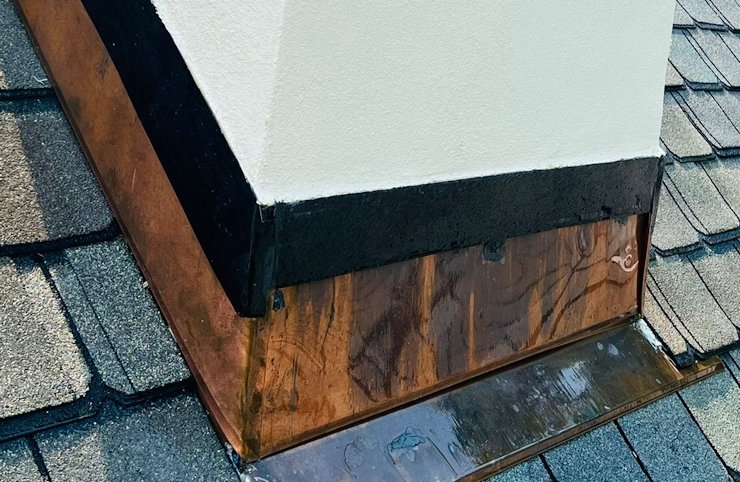
Finished chimney. New stucco overlaps the S flashing and exits. No more leak.
We were stuccoing an old chimney in Arlington, Vitginia and someone stopped to say his chimney leaked. Somebody charged him to put 2 coats of synthetic finish on the chimney and it still leaks. Water will penetrate stucco even if it has been painted or synthetics or whatever. The leak is from the flashing or the crown or the shoulder, if there is one. Putting another layer on top won't solve the problem.
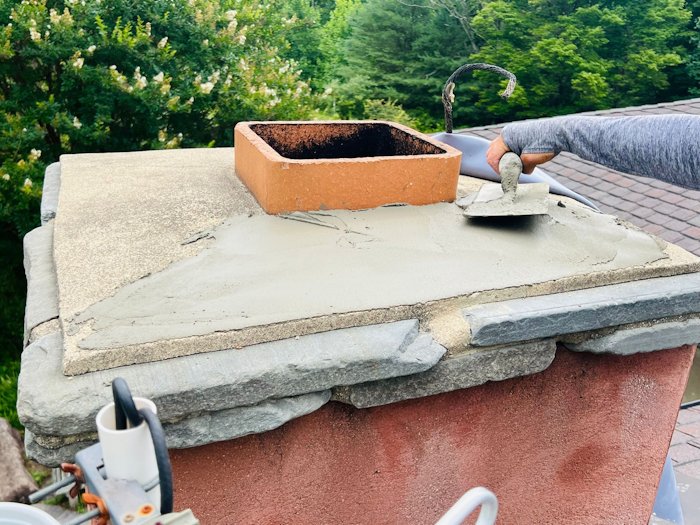
Another chimney in Culpeper County, Virginia done the same way. The slate crown was leaking and needed a re-do. In fact, we recoated the stucco on the whole house. Here, our bonding mortar is put on top.
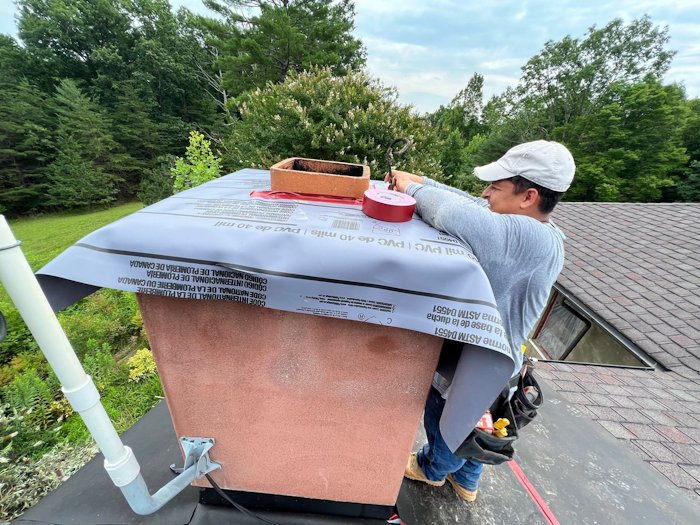
Rubber membrane is stretched over the sides. The flue is sealed with tape.
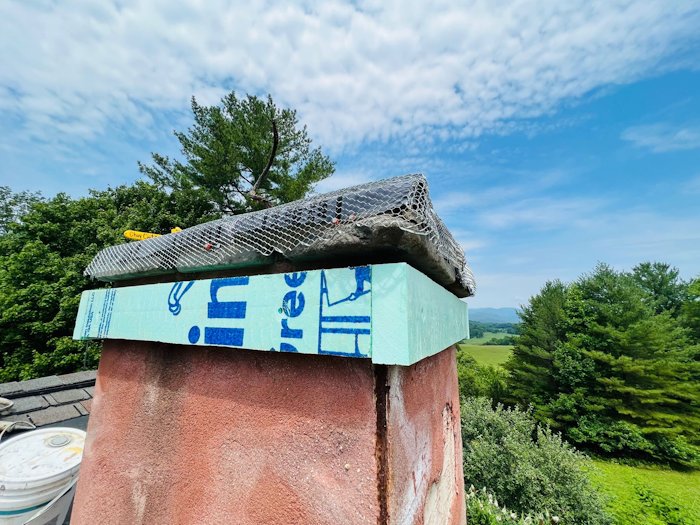
Top and sides are covered with metal lath. A form is made with styrofoam for the band. The styrofoam is temporary.
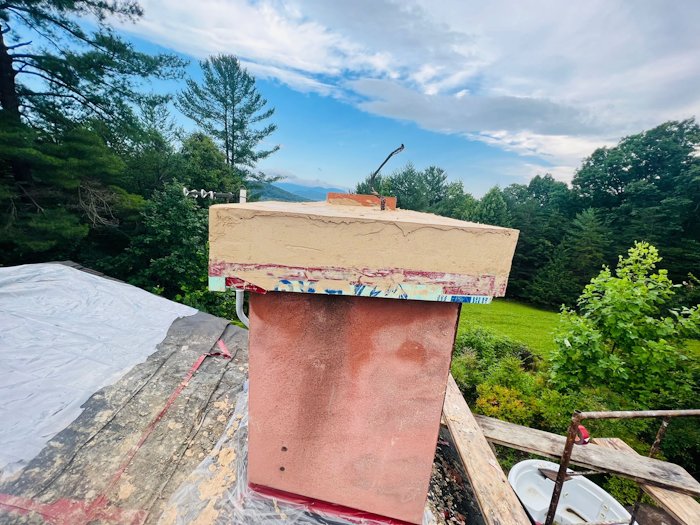
The crown and band are filled in with mortar with plenty of acrylic bonder, not only for strength, but it makes the mortar less permeable.
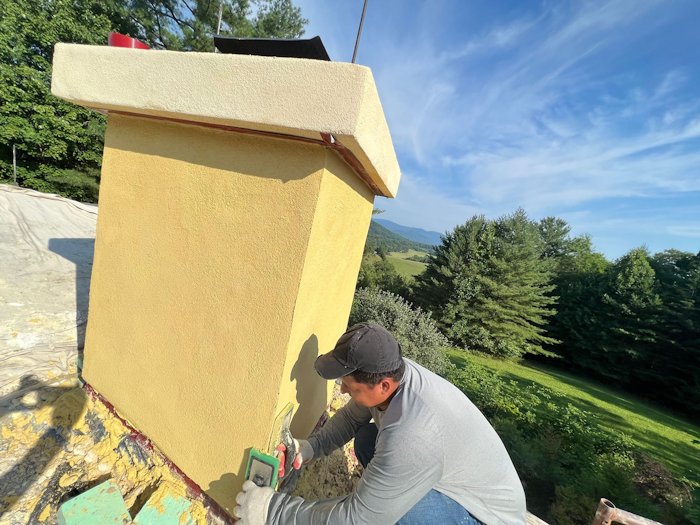
Finish coat is white portland cement and white sand with a color. The yellow matches the house and the white top matches the window sill. Check out The Blue Ridge mountains in the background.
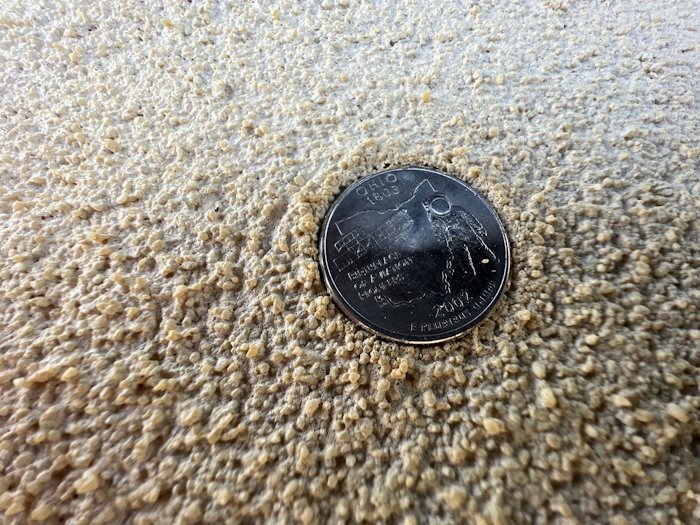
All our chimneys have coins embedded in the top. This is an Ohio commemorative quarter.
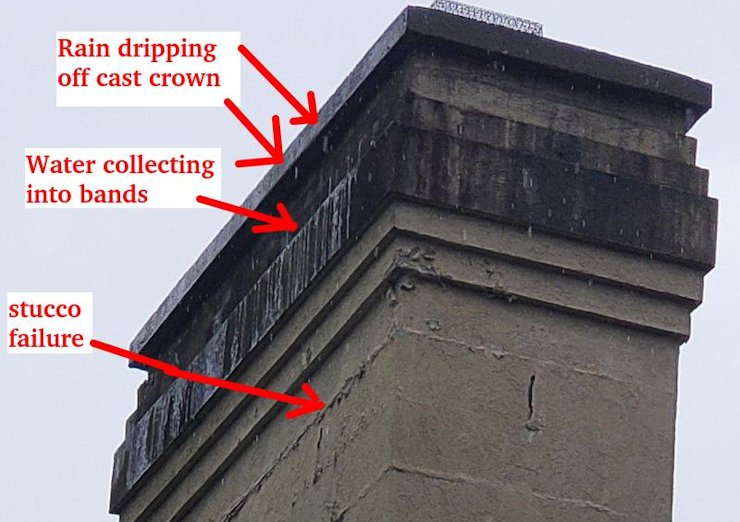
This picture was taken in the rain and shows the problem. Poor design led to failure. This is a giant water funnel. The stucco is paper thin one coat stucco with a synthetic finish on block.
EIFS bands absorb water like a sponge:
Chimney is one coat stucco on blocks with EIFS (styrofoam) bands.
Flimsy EIFS can be pulled off with your fingers:
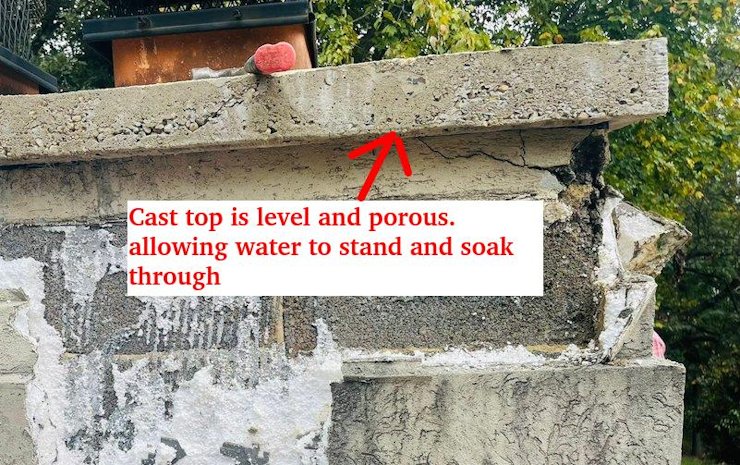
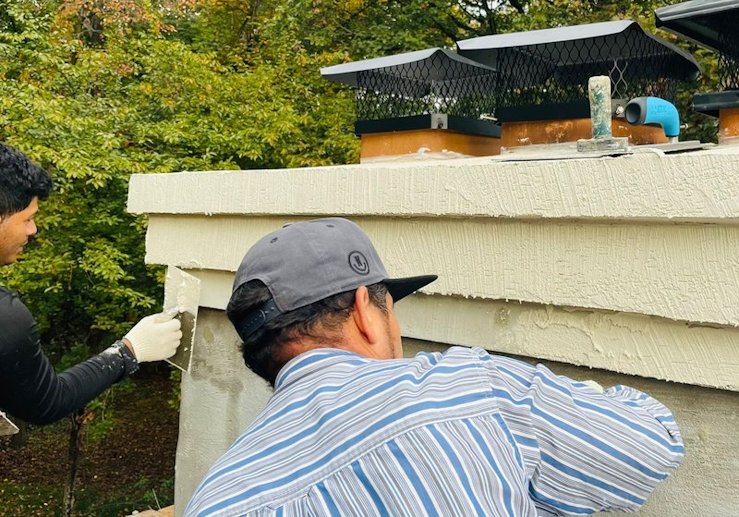
The new crown is my design. The top is rounded for good water run-off.
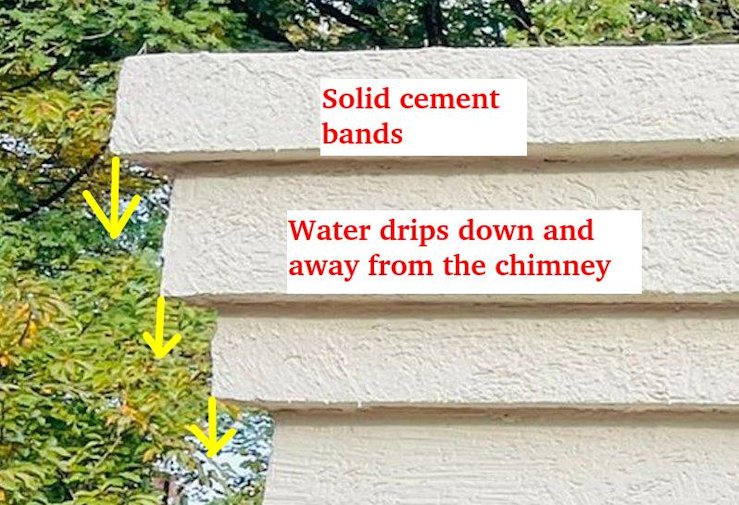
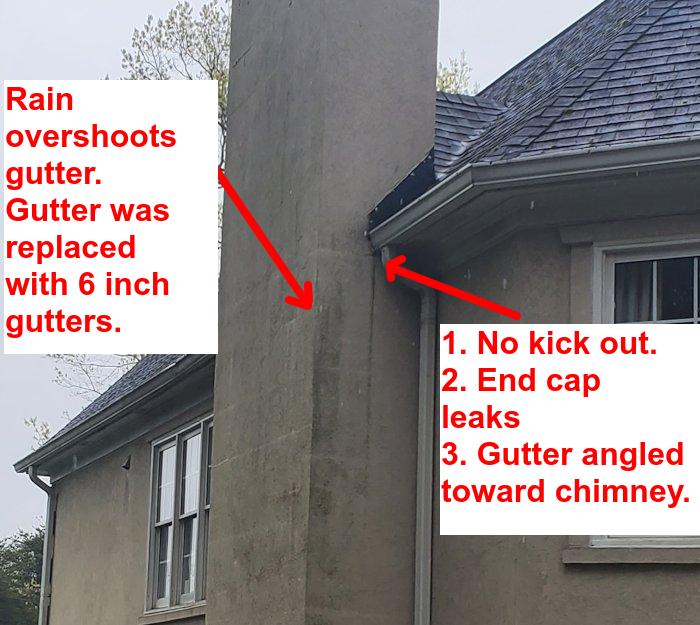
There were other problems with the chimney, that I didn't need a drone to figure out. New gutters were put on before we started. On a big house with a steep roof like this, 4 inch gutters aren't enough.
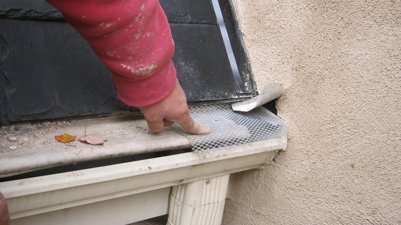
These gutter guards are another source of stucco failure. On these guards, the last few inches were solid, deflecting water into the wall. We corrected this by cutting a hole for our kick out to aim water into the gutter, and using a piece of metal lath to screen leaves.
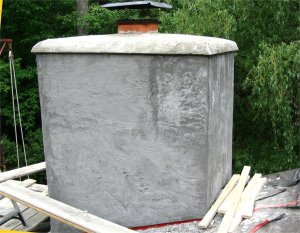
A couple of creative crowns. This is a mushroom shape.
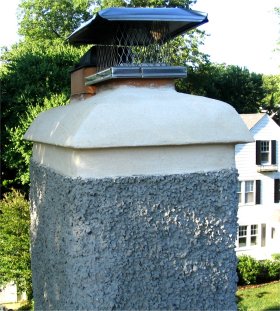
This mushroom was easy to make. A 2 x 4 was used to make the band and the crown filled to the 2 by. The top was finished white and the bottom is pebble dash. A band or a drip edge a necessary for the life of the stucco. Don't believe me ? Go to an old neighborhood and observe. Old stucco or brick chimneys without a band at the top are in bad shape or have been patched, usually multiple times.
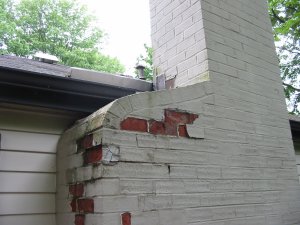
Brick chimney shoulders are porous and are damaged, too.
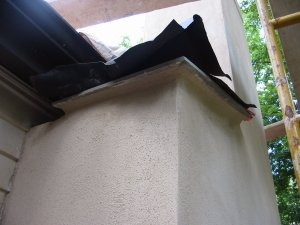
We put on a flagstone shoulder and the stuccoed the chimney. This is my first flagstone shoulder. I did this in 2003. I got the idea from old houses in Chevy Chase. Almost all chimney shoulders on old houses in Chevy Chase have stone shoulders.
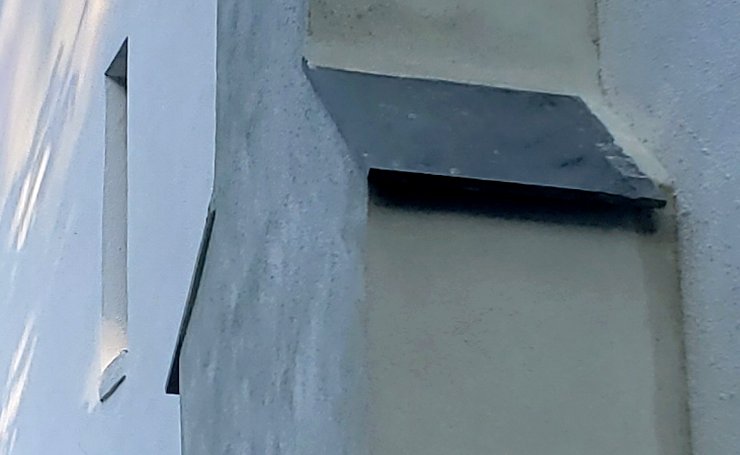
Typical of our flagstone shoulders on this chimney in Fairfax, Virginia.
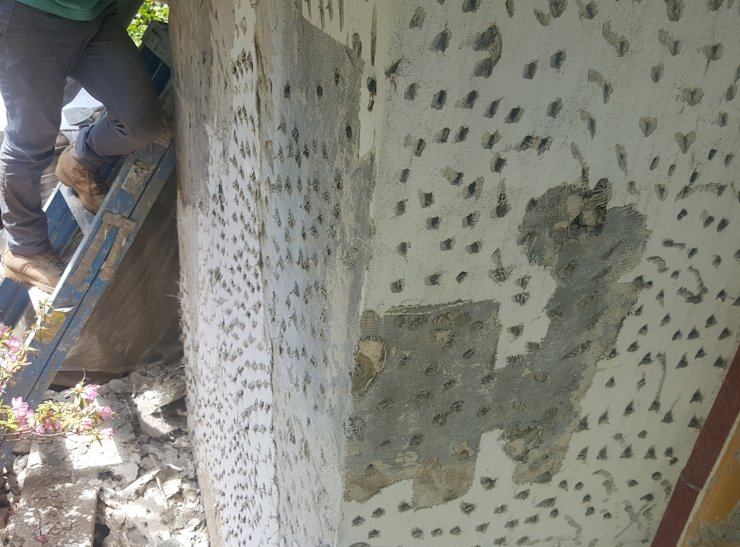
EIFS basecoats and finish will fail over time. This material was made to go on styrofoam, and not painted stucco or block. Here we peeled of what we could. The rest has holes chipped through and walls coated with our cement basecoat with a chemical bonder.
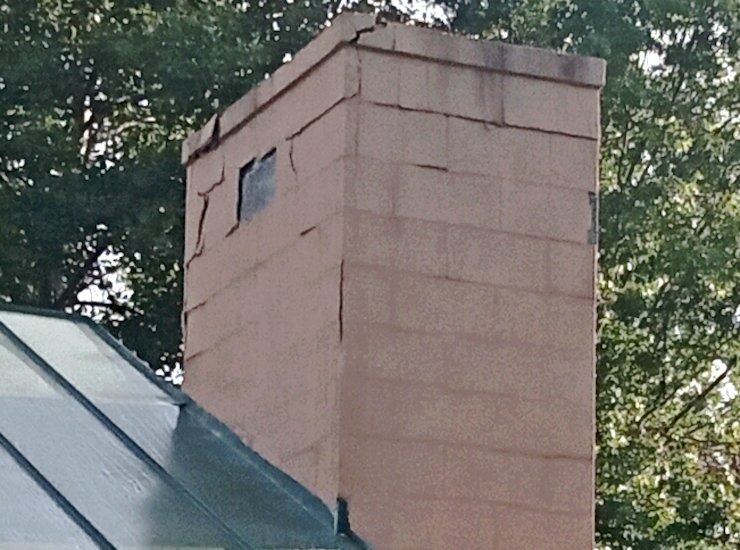
This chimney was done with EIFS cloth and EIFS basecoat and finish. This is less than 5 years old.
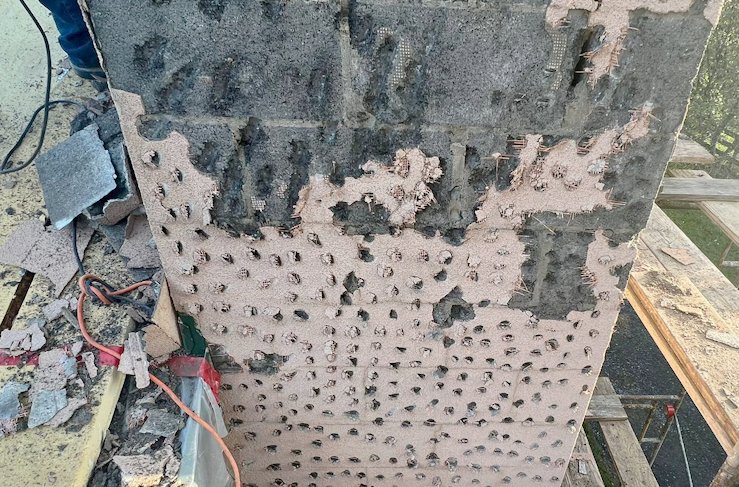
We peeled off what we could and chipped holes in the rest.
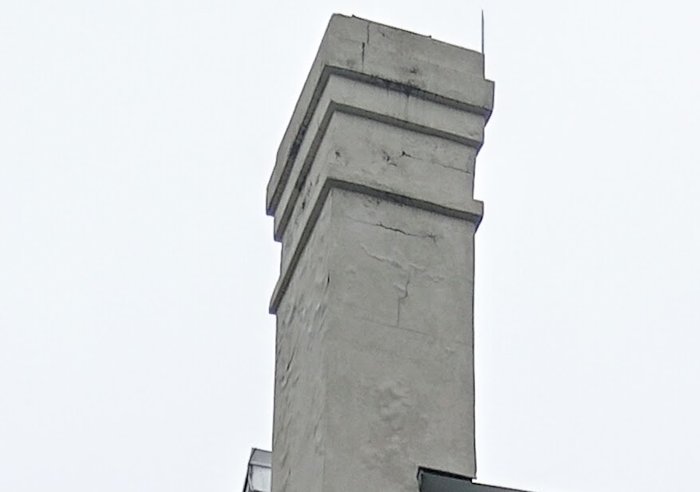
Chimneys in Middleburg, Virginia were done with EIFS basecoat and finish and are peeling off.
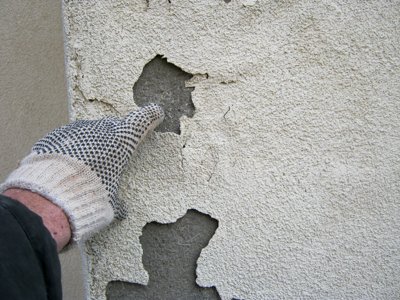
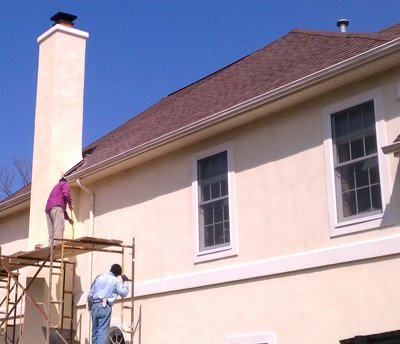
Here's a link here to a Toll Bros. chimney we re did. This seven year old chimney in Herndon, Virginia was one coat stucco with foam EIFS details and was already falling apart. This chimney was done by a big EIFS contractor.
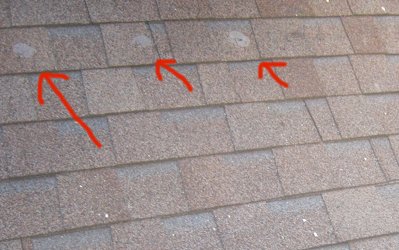
The morons nailed through the roof to put up scaffold and filled the holes with caulking. Caulking doesn't last long on a hot roof. The homeowner had to replace the roof a few years later. The roof was all wavy from where the plywood was warped. Incompetent contractors like this do more harm than good.
If you must nail through a shingle roof, for example, to put on roof jacks, this can be done by lifting the shingle up, and nailing as high as possible through the shingle below. After you are finished, the nail holes can be filled with black roof cement like Henry. It isn't a bad idea to glue the shimgle down with a little Henry. If you rip a shingle, the shingle can be repaired by cutting a small piece of sheet metal and gluing the shingle down with Henry. Driving nails through a roof is as stupid as you can get..
This chimney was failing because of EIFS bands that were level, creating a water funnel. The bad flashing, that is flashing over the stucco and not under the stucco, was leaking. You could stand back from the street and see waves in the roof around the chimney where the flashing was leaking for years. It is big money to replace the roof on a big house like this. We rescued the roof.
Thanks so much dear readers, for reading all these years, and for all the comments.