Stucco and the blind man
Chapter 7: Bonding mortar-plaster and cement.
In other words, what holds this stuff together.
I've written about bonding plaster and stucco of before. I wanted to put everything in one file to make it a little less confusing, a little less boring, and easier to reference. I'm going to cover ways of bonding plaster or cement mortar so here goes:
There are three main methods of bonding plaster to wall or ceiling:
1. Number one is a chemical bond. This refers to paint on bonding agents such as plaster weld and weld crete and also bonding admixtures such as acryl 60.
2. Number two is a suction bond.
Suction is when a surface absorbs water.
An example of a of a suction bond is bricks and mortar. A brick absorbs water rapidly like a sponge. When you take a dry brick and put mortar on, the brick absorbs the mortar into the pores. When the mortar sets up it's locked in place for a permanent bond. An example of a low suction surface is concrete, which absorbs very little water, and an example of a high suction surface is old bricks from the 1800's. You can wet these old bricks with a hose and the water soaks in faster than you can wet them. The old bricks have too much suction for a good bond because they can absorb the water out of the mortar instead of absorbing the mortar.
Number 3. Number three is a mechanical key.
An example of a mechanical key is metal lath. Mortar squishes through the lath and wraps around the metal. Once the mortar sets up, it's locked in place. There are other kinds of a mechanical Bond besides metal lath. For example, leaving nail stuck out of a wall and the mortar wraps around the head of the nail locking it in place. This works sometimes for ornamental work or small details when one can't use metal lath because it is too wide. Another example of a mechanical bond is knocking holes the material, for example sheet metal. This allows mortar to squish through locking the mortar in place.
Most people think a chemical bonding agents and admixtures are like voodoo. However, it's simple how they work. It's very simple, also, how they fail. When a chemical bond fails it's expensive and also embarrassing. It can be dangerous as well.
I had the honor of working with an old plasterer almost 50 years ago in Richmond, Virgina in an old hospital renovation. One day he painted a operating room ceiling with a cheap bonding agent that we used. He white coated the ceiling one day and the next day the plaster had fallen off the ceiling and was lying on the floor in sheets. His solution was to chip the ceiling about every three or four inches with a hatchet, paint the ceiling with the bonding agent. This time it stayed in place.
Bonding agents should be stiff and sticky not real thin and watery.
I had a humiliating experience the same way. I scaffolded off an old dining room and replastered it. The old plaster was a old sand finish with a rough texture and they wanted it smooth. I painted the ceiling one day with a brand X bonding agent that said "bonds plaster to plaster". I brown coated the dining room with a thin brown coat. The next day I white coated the ceiling and finished the room down to the scaffold level. The next day the plaster popped off in sheets and was all lying in the floor and on the scaffold.
I had to fix it all for free. I also lost the job of recoating the whole house. At the time I was too lazy to drive to Arlington, Virginia for a bucket of Euco weld. Instead, I bought this material in Manassas that said bonds plaster to plaster on the bucket. I realize the value of not using thin, watery, body agents and rely on brands that I trust.
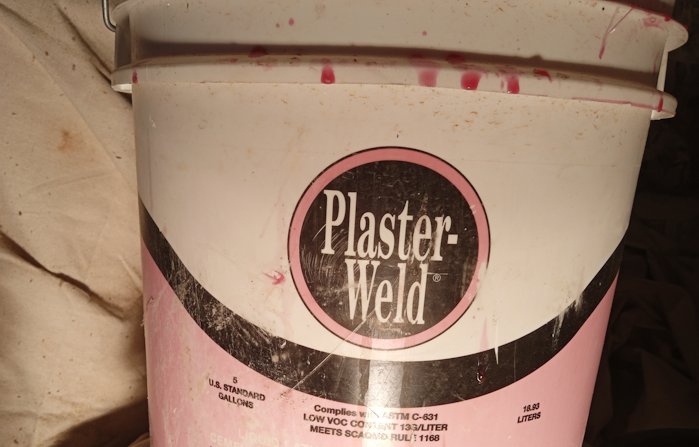
Plaster weld is a paint on bonding agent for interior plaster
Plaster weld is the original plaster bonder, made in Maryland near Baltimore by Larsen's. It's a thick, sticky liquid that's pink. Another excellent brand that I use for years is Euco weld which is also thick and sticky and pink. It was discontinued years ago. I just noticed they came out with a Euco Weld 2. United States Gypsum makes a transparent plaster bonder which works great. There are others, but one should be very careful about what brand they use.
I have seen other failure with bonding agents. I worked for a company years ago and we plastered the elevator lobbies which required high strength walls. Somebody who was a company man decided to add water and thin down the plaster weld to save the company money. We scratched and browned the lobby one day, and went back the following day and all the plaster was lying on the floor. Nothing worse than a company man.
Another route to plaster failure is using wet brushes and rollers. We had two ceilings fail in a government job where we painted the old ceilings with plaster weld and they failed around the edges. I wanted to share with you to never use wet brushes or wet rollers for plaster weld.
There are paint on bonding agents for exterior stucco that are made for cement only, such as Weld Crete. By the way, interior materials like plaster weld should NEVER ever be used on the exterior of a building. There is a warning on the bucket to never use for wet areas like showers, or outdoors. This is what happened when you see an old building with stucco popping off the wall and you can see green or pink bonding agent. It's because somebody used Plaster weld for outside stucco.
I prefer bonding admixtures for stucco. You get a very durable product and a far better job than with Weld Crete or paint on bonders.
We stuccoed the side of a building years ago with a paint on bonding agent that is falling off the wall, even though we put some chips in the block. I'm not going to tell you where it is.
There were a lawsuits in Florida from Weld Crete failing that was used on painted stucco.
These exterior paint on bonding agents work fine for unpainted cement stucco and concrete. Still, admixtures are far better.
Admixtures are used for low suction or high suction surfaces. The adhesive bonds to concrete, soft bricks or other surfaces. We use admixtures half and half with water our cement mortar with this mixture instead of just water. Mortar can be put on thin and still develop great strength.
How plaster weld Works isn't voodoo, but isn't really logical, either. Plaster weld is a thick latex material thicker than paint and dissolves in water.
When wet plaster is applied the surface of the plaster weld dissolves with the wet plaster. Then, the plaster weld re-hardens and the plaster hardens, locking the two materials together. Plaster Weld isn't is really non-toxic but there are no VOC's.
Contrary to popular belief, plaster doesn't have to be applied to plaster weld when it's still sticky. It's a good idea to let it dry thoroughly before plastering. We have had failure when we applied plaster too soon. You can plaster when the plaster weld is only partially dry. It can be a little sticky but not too goopy.
Plaster weld is another material that's ruined when it freezes. When plaster weld freezes it turns into a pink foamy material. It is hard to mistake if it has been frozen or not.
It is important to put plaster weld on when it's 50° or above because it dries like paint. It needs to be warm enough for water to evaporate. I don't think there's a time limit on applying plaster to plaster weld. We've applied plaster up to two months later. This stuff works. I put on a ceiling 4 in thick over plaster weld without worrying about any failure. I put on a scratch coat of brown mortar and let it set up overnight and dry for suction then filled it in the rest of the way. Bear in mind there's no suction on a plaster weld surface. It is like putting plaster on an ice cube and slipping and sliding all over.

Picture of the dome we patched in 2012. Plaster on the dome had extensive repairs due to water infiltration.
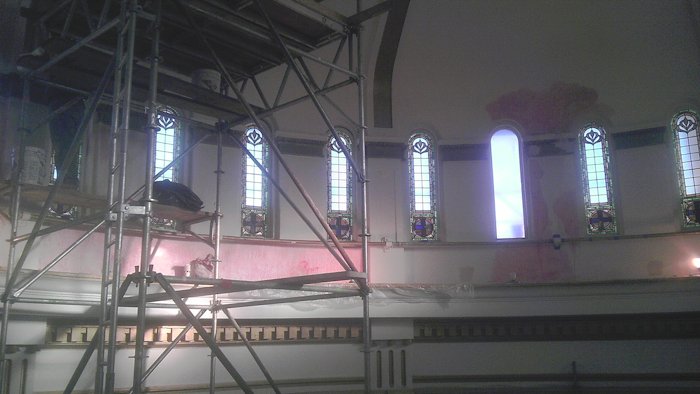
Not a great picture, but it is all I have got. The pink is plaster weld. We knocked off all the loose plaster and painted the patches with REAL larsen's plaster weld.
We patched a plaster dome in a church in 2012. You may have seen it on my site before. Here's a picture above. The ceiling was over fifty feet from the floor of the sanctuary.
There was a scaffold there about 35 ft high with a scaffold on top of that for us to work. The ceiling was damaged because the old cupola and steeple leaked for years and needed to be replaced. Our mission was to patch nice old ornamental plaster dome. The dome was real thick white mortar, that is molding plaster and lime. We knocked pieces of the loose areas off and filled them in. Remember plaster won't bond to finished plaster without a bonding agent. I needed a plaster weld that was reliable. Just stop and think: if a piece of that ceiling fell off and hit somebody below in the pews it would kill them. Just imagine the headlines of the Washington Post the next day: "unscrupulous plasterer kills parishioners in church". I would never get the blood off my hands if I used a bonding agent that failed.
I went to the building supply to get some plaster bonder and the guy showed me some watery stuff of the brand I never heard of. I told him no. I called around and found some real Larsen's plaster weld in Maryland and went and picked it up.
After the church remodeling was finished (we did the outside stucco, too) they gave me a plaque during the church service for workmanship. When they gave me the plaque they announced, "Reggie's crew patched the dome.", and everybody looked up. I can only guess what they were thinking. At that moment it was a great honor to be trusted with the plaster on the dome.
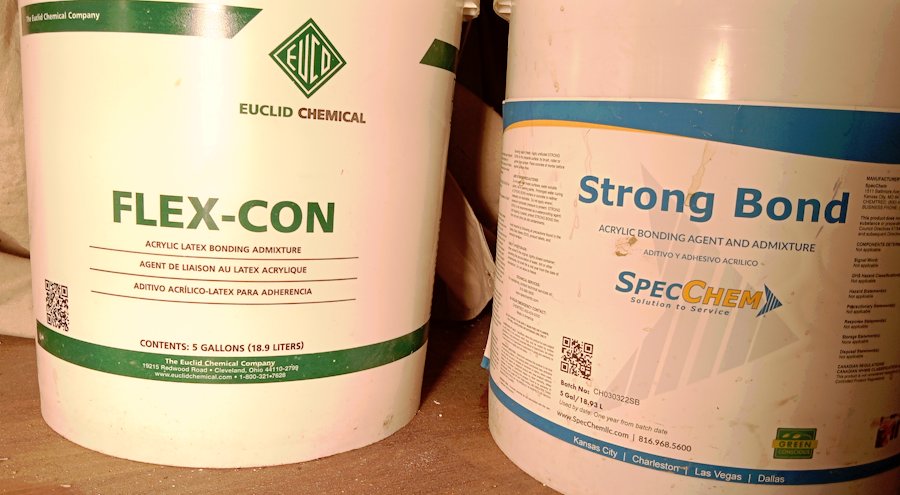
The one thing that has improved the quality of our product dramatically, as far as exterior stucco goes, is acrylic bonding admixture.
They way these admixtures work isn't logical either but they aren't voodoo, and how they work and can be simple to understand. The acrylic is an adhesive, and when mixed with mortar forms a sticky material.
Acrylic admixtures have been used for years for plastering swimming pools. Concrete is a low suction material. It's not very porous and mortar doesn't bond directly to concrete. More about swimming pools below.
There are two ways of using the acrylics on concrete. One method is a bonding coat. This is usually done by mixing Acryl 60 (or whatever brand of acrylic) full strength with pure Portland cement and painting on over the concrete with a stiff brush. Ideally, the brush leaves brush marks and leaves the surface rough. Then, color cement mortar with acrylic can be applied.
Another great use for acrylics came out in the 1950's when Finestone Corporation developed their method of exposed aggregate stucco.
The stucco brown coat in a Finestone application was painted with their acrylic, sealing the pores. This killed the suction for when the Finish coat was applied. This slowed the set of the mortar and allowed time to throw the rocks into the mortar. The finish coat material had little sand and a lot of acrylic. The rocks stuck good in this sticky mortar.
There was an excellent bond that one probably wouldn't expect, seeing how the acrylic was used as a paint on bonding agent. There is something about having acrylic in the finish that enhanced the bond. I know what a super strong bond it is because I've chipped off Finestone finish with a chisel and I promise it is stuck on there super good. So in this case an acrylic is used as a paint on bonding agent and an admixture and the two materials work well together.
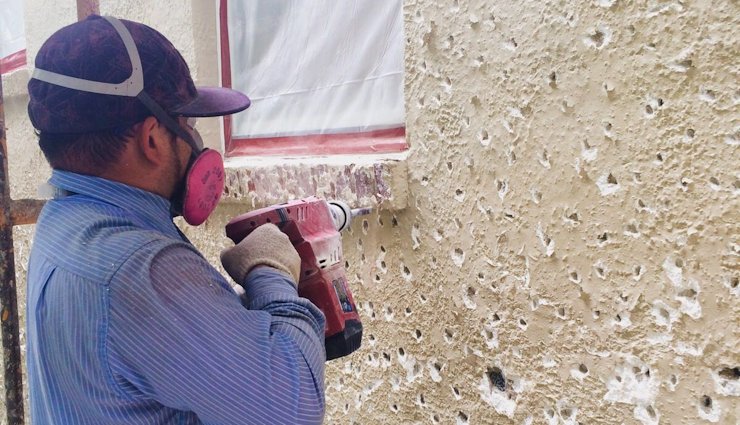
Here, old painted stucco is chipped before applying a scratch coat of mortar with acrylic. Here's a link to an example how we do this.
We use acrylic bonding admixture for chipping and recoating stucco. Now you see where I got the idea from: from the operating room ceiling above. The two methods work well together, that is chipping and bonding. Now we do a lot of stucco recoating, something that we couldn't have done in the past, thanks to bonding admixtures.
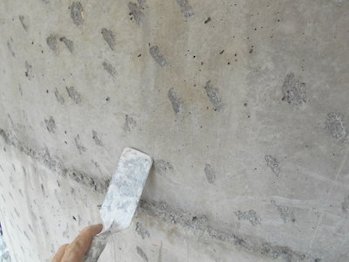
It may not be necessary to chip concrete, but we do it for insurance the stucco won't fail. Here's a link to an example how we do this.
The most well-known brand of acrylic is Acryl 60. We use a lot of Flex Con made by Euclid chemical which works really good and it's a lot cheaper than Acryl 60. Now that the price of Flexcon has gone up, we've been using a brand of acrylic called "Strongbond" by Spec Chem in Kansas City. Kaufman chemicals in Baltimore makes a good brand of acrylic. I've only used it after the mix was frozen it was no good. I assume it's good. I would like to use it in the future if I could find a supplier close by and be assured it hasn't frozen.
When acrylic admixture like Flexcon freezes there are crystals that form in the bottom of the bucket indicating a lot of solids have separated from the water. This material is now no good and must be thrown away. Another way to identify frozen acrylic is it looks like soap flakes, or particles floating around in water.
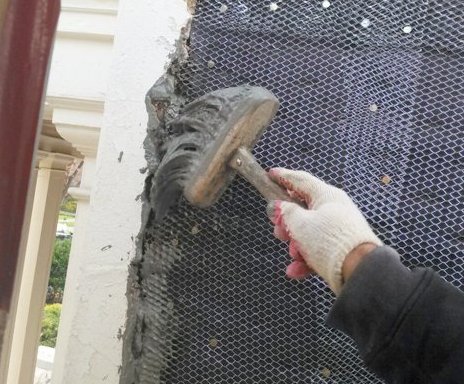
A paint on bonder is made for stucco using pure acrylic and Portland cement. This is mixed as a paste and used for joins, edges of patches, and edges sometimes called cold joins. Follow this link for more about this method.
There are some good side benefits to use in acrylics in stucco. One thing the acrylics do is double the compression strength of Portland cement mortar, so now you have a super hard mortar that's well bonded. This has opened up an opportunity for us too to rebuild old historic work or old deteriorated bricks that are crumbling and falling apart. We patch the bricks with Flexcon mortar and the stucco holds everything together. This has allowed us to restore old brick walls that are pretty flaky and deteriorated and produce a durable product.
Another benefit of acrylic is increased flexural strength. What that means is it adds crack resistance and movement resistance to the cement mortar. We mix acrylic half and half with water. Some people go one fourth acrylic to water in plastering swimming pools, but we go on and do half and half. This is insurance that our mortar won't fall off the wall.
Another benefit of acrylic is reduced shrinkage cracks, the reason is that the liquid is held in the mix a lot longer with a with acrylic.
YET ANOTHER benefit of acrylic is it makes the mortar less porous, so it sheds water better and lasts longer. This feature pays off on the tops of chimneys and other areas that are almost horizontal.
I was turned on to using a lot of acrylics by Don Miles who died in 2001. He did sell his own brand of acrylic called Milestone, but he confided it in me when I was in a pinch that I can use Flexcon or acryl 60.
I originally started using Flex con half and half with water for color retention for color work, but with the side benefit of being a bonding admixture, it's insurance my product won't fail.
On concrete, we generally chip the concrete every three or four inches or so. This ensures a good bond to concrete. The chipping leaves the pores open and the surface rough for a good bond. Now we have two methods of bonding: a suction Bond and a chemical bond.
An old fashioned method of bonding to concrete is Portland cement paste. I learned this from the old guy at the hospital. This method of bonding was used many years ago and swimming pool construction and for bonding stucco to concrete or interior plaster to concrete. First a paste is made with Portland cement and water the consistency that you can put on with a paint brush. First, the concrete is washed down at least good enough to get the dust off, and the Portland cement paste is painted on with a paint brush preferably with side to side strokes.
The paste sets up immediately, as soon as it hits the concrete. It is important is scratch mortar on this paste before it dries, and it dries quickly. One method of doing this is person with a paint brush painting on a section say about 3 ft. by 3 ft., then immediately scratching some mortar on. Another method is two people working, one going ahead painting and the other one scratching mortar on the paste. After this mortar sets up overnight, the wall can be filled out. I've done this with interior plaster also and it provides an excellent bond.
There's a method I've seen done in Mexico and I've seen it done here, but very little, is called salt and pepper. The Portland cement paste has some sand mixed in with it and a splattered on the ceiling. After real soupy mortar is splattered on the ceiling and sets up, the scratch coat can be put on and the ceiling filled out the rest of the way. This does work really good. If you're in Mexico look up. If a piece of that stucco popped off that 3 story high ceiling and hit you on the head, you would be dead. This method does work, but requires someone experienced.
Concrete is considered a low suction surface, but there are high suction surfaces that have way too much suction to stucco over without preparation. One example is old, soft, porous bricks from the early 1800's. You simply can't wet these good enough. Mortar will fail because the water is sucked out of the mortar into the bricks, and not the mortar sucked into the brick.
Our method is first to soak to bricks down with water preferably the day before applying the scratch coat. We mix 1/4 acrylic and 3/4 of water and splash it on the wall with a brush. This seals a lot of the pores and reduces the suction to about what a normal brick is. We then put on a scratch coat with half acrylic and half water. This is also a very solid permanent bond.
I need to tell you a couple of experiences of failure from too much suction.
One example is we plastered the inside of a townhouse in Capitol Hill, Washington, D.C. We plastered over old soft porous bricks. After a scratch and a brown coat, the mortar the popped off the wall in sheets. In this case I stripped it down to the brick. Instead of the painting the brick with plaster weld, I put up metal lath. The reason for using lath and not plaster weld is the old bricks were dusty and there was dust inside the pores. I felt better putting up metal lath. We nailed into the middle of the mortar joints and not into the brick.
Another example is on an old ceiling we knocked off the mortar and left a scratch coat on the metal lath. We wet down the scratch code and put the brown on the ceiling. The next morning it all popped off. The reason is the old scratch coat had just way too much suction seeing how it had been drying since 1920. Our solution was to knock the mortar off the metal lath to use the lath to key the mortar on the ceiling.
Enough for now. I hope you aren't bored to tears. Thanks so much dear readers, for reading all these years.